|
|
MY SHED EXTENSION | |||||
| I
decided to double the size of my bird room in January 2003. The
principles of this extension can be used if you are building your shed for
the first time. The pictures below show the stages and progress of this
project. This was the 5th bird room that I have built so I wanted to make
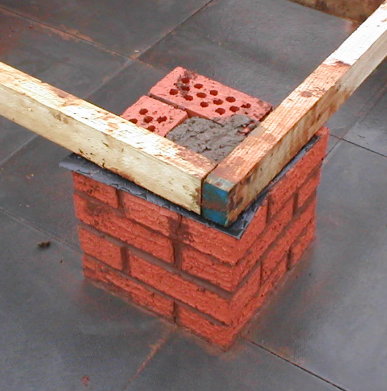
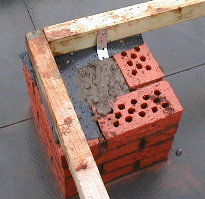
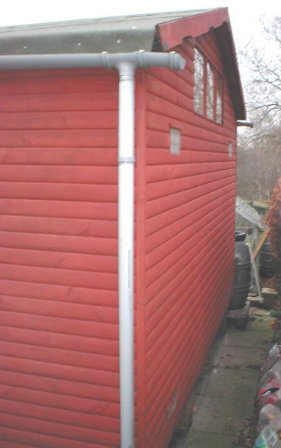
sure that it was right this time The first job is to decide on the size of shed that you feel is adequate for the amount of birds you require. Build it as large as possible with the funds that are available or else like me, allow room for expansion as you can afford, and need, more space. Remember, more space requires more cages, more cages means more birds, more birds require more attention and lots more time. With this in mind my shed size before the extension was 12ft x 8ft, at its lowest point it was 7ft 6" and in the middle it measured 9ft 6". The reason for the extra height is so that I could add a window in the back panel above the cages for extra natural light, also having 7ft 6" gives room for an extra row of cages. These cages need a small step to get to but I only use them during breeding season when extra cages are required. I then use them for my mules and hybrids that are not used during this time of year. If you are small these cages are too high, but I am 6ft tall so I only need an 8" step to feed the birds. This extra height also helps to disperse the heat of summer and the shed stays much cooler. This part of the shed has 74 cages on 3 sides. The bottom cages are 2ft in height, 16" deep and 2ft 6" wide. There are 3 on each side, and 4 across the back, with sides that can be removed to create longer cages. The side cages can be opened up to 6ft 6" approx. and the back cage can be opened up to 7ft 6" approx. On top of these cages are 65 canary type cages, 13" deep with 15" x 12" cage fronts that can be opened up to create doubles, trebles and quadruples. The idea of different size cages helps depending on the species kept. For example, crossbills need more room than canaries or siskin etc. Now to my new extension. To start with the area was slabbed, then 12 pillars were built to 4 courses high, then a 3" x 2" frame was constructed to carry and strengthen the floor. Damp proof membrane was attached to every pillar where the timber touched the brickwork, to stop rising damp from rotting the wood. The timber used was tanalised treated to protect it from rotting. The wooden frame was then attached to the pillars using galvanised joist hangers, bent and dropped into the centre of the pillars, then filled with concrete. The final job at this stage is to construct the steps to allow easy access to the shed. It is not necessary to lift your shed off the floor, but I feel that it stops vermin like mice, rats and stoats etc. from gaining access, also the airflow stops the floor from rotting. 9" x 4" air vents are fixed on the back wall 2 low and 2 high. |
||||||
|
|
 |
|
||||
|
Weather treated timber (tanalised) |
Shed Base |
Damp proof membrane& Galvanised joist hangers |
||||
|
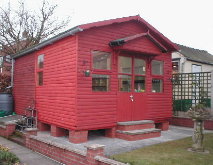
The next stage is the erection of the shed. My shed is built with tongue and groove log lap, with 3" x 2" framing for extra strength. The log lap is 3/4" thick so no insulation is necessary. This shed is 6 years old and not one joint has opened up in that time, but it now needs refelting on the roof. This will be done when the extension is added. The next job was to remove the front of the shed, add the floor and screw it to the timber frame. Then add the new sides, which have windows in for even more light, and refix the shed front 8ft further forward. The next stage was to fix the two roof panels and refelt. Inside the roof there are three purlings to carry the weight of the roof, especially when there is 6" of snow on it, as there was when this was being constructed. The next job is the guttering and repainting of the shed so it all looks as one. The outside is now complete. |
||||||
 |
||||||
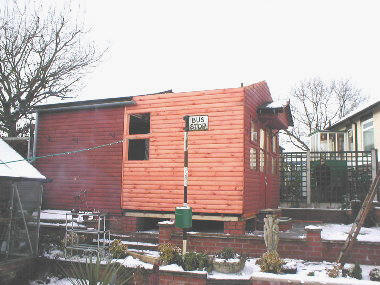
| Just the roof to go on in the new section | ||||||
|
Most shed companies will fix the shed for you, as they did for me, at no extra cost. It is worth ordering your shed in the winter when the shed companies are quiet, you will get a better deal. Also it can be completed in time for the coming breeding season, my shed now measures 16ft x 12 ft inside. Remember to plan the inside before you order your shed, so your cages will fit exactly from edge to edge, it will make the overall internal appearance much more pleasing. Your shed will cost you no more if it is a few inches longer or shorter to fit your cages exactly. |
||||||
 |
 |
 |
||||
|
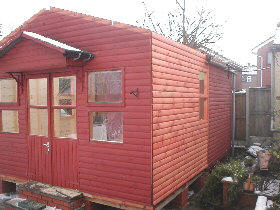
Just the roof to do |
Luckily it's stopped snowing |
at least I can lock the doors? |
||||
|
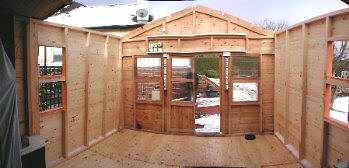
The new extension is now sealed. The next job is the electrics, the shed required 3 x 6ft florescent tubes, 2 dimmable bulbs to act as night lights, or just dimmer lights. This gives the facility to turn off the tubes and dim the lights, to allow the birds to roost before putting them in total darkness, also a timer to allow the lights to switch on in the morning and off at night. 3 double sockets were then installed at various points. The next job is the floor covering. I am using marley tiles, these can be cleaned easily. Before installing the tiles the tongue and groove boards of the floor need to be covered with thin plywood sheet, to stop the tiles from cracking. The tiles can then be glued in position. Do not use an adhesive that gives off heavy vapours if like me you have birds already in the shed. The guttering needs to be extended and the shed needs the outside colour matching and coating with a quality shed treatment. The product I use is Ronseal shed and fence guard
|
||||||
|
|
|
 |
||||
|
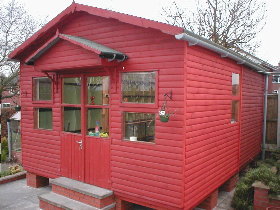
Outside complete |
Back of shed showing window above cages and 4 vents 2 high 2 low |
See my cages page for internal veiws |
||||